
WooCommerce provides business owners with an easy-to-use order management solution. There are no built-in solutions for exporting order information, though. It’s possible to export your data from WooCommerce in a variety of different ways.
While WooCommerce allows you to run your online store entirely from your WordPress dashboard, you should set up your order fulfillment and record-keeping systems. One of the abilities that may help you better monitor and evaluate your site’s purchases is knowing how to export WooCommerce orders.
WooCommerce does include a CSV-compatible product exporter, however, you can only export orders in XML format from the platform. So, third-party programs will be needed to export this data in CSV format.
Thankfully, WooCommerce Order Export PRO is the plugin you want to have to export orders data. The plugin comes in both a free and a paid version with a plethora of handy features.
WooCommerce Order Export PRO
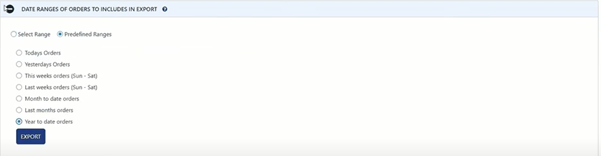
You’ll find various options and filters on the plugin settings page to tailor the export file to your needs. To begin, you will be able to filter orders by date. You are given an option to select a range of dates by using “FROM DATE “and “TO DATE.” Also, you can choose some predefined ranges like today’s orders, yesterdays orders, this week’s orders, last weeks orders, month to date orders, last months orders, and year to date orders.
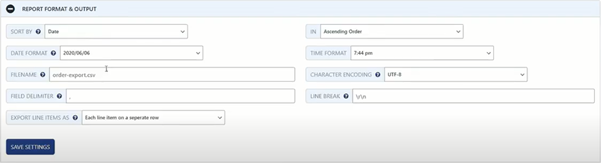
The next thing you get is choosing how the data is formatted in the export. You can choose everything and indicate how you want orders sorted in the export file. To sort the orders, you may pick from a wide range of factors. You can choose to descend or ascend order after selecting the applicable one.
Also, you can choose a suitable format for the date and time and add further specifications to each file type. Please keep in mind that the specific characteristics of each format will determine these choices. Of course, you will get to choose the name of the file.
Even if you have non-western characters, you will handle that without a problem. Another great thing you get to choose is that if a customer orders more than one item, you get to choose whether you want to show them on separate columns or one item per row.
A pretty cool feature is the plugin will remember which orders you have already exported and only export new ones. That’s quite a nice new feature you get from the plugin.
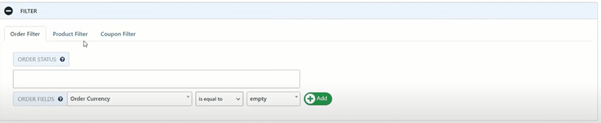
Orders can be filtered for export depending on their state or the value of a custom field. Simply choose the appropriate field and enter the relevant information. To filter more efficiently, you’ll be able to add new fields and provide criteria.
Here you’ll also find options to indicate whether or not to include child orders and whether or not to export refunds. There are other options to label exported orders and just export orders that have not been marked. You can do the same with products and with coupons also.
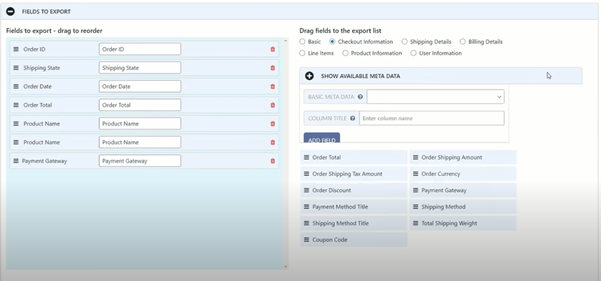
When it comes to setting up fields for export, the plugin gives you many options. You can find all the fields that apply to the current export. You may drag and drop the export fields around in this list to adjust their order. All of the available export fields are divided into separate categories.
To include any fields in the export, drag it from the right to the left side. Filtering by product allows you to personalize the export file with data particular to that product. You have the option of exporting all goods or filtering the file using various parameters.
Product categories, suppliers, product names, SKUs, taxonomies, custom fields, changeable product characteristics, and so on are examples of these. You may also remove things that have been completely reimbursed or individual products from the file. The plugin comes with many additional filters.
When you are finished with formatting everything, you get another cool feature. You can preview the first 25 records that match, and if you like what you see, you can go ahead and export.
Another fantastic feature this page gives you are the export and import settings. You can see precisely what input parameters were selected on the settings page. You usually use it if you are having trouble getting your orders exported. It is beneficial for troubleshooting; if you have troubles, you can send the settings to the tech support, and they can load it into their system to see what is going on.
Another great feature that most people like about this plugin is the scheduled exports. You can schedule as many exports as you like, and the summary table lets you see at a high level what you have done. You can see the title of your orders, the delivery methods you have, some information about delivery details. Just for your reference, you can see when it was the last running, and we will run again.

Exporting Orders Manually
You may manually export customers, orders, and coupons at any time. When you start a bulk export or export items from the Orders or Users lists, a modal will appear to inform you that the export is in progress. You may download the file if you leave the modal open while the export is underway. On the other hand, order exports run asynchronously in the background on your site, allowing you to quit the modal or leave your site altogether while the export is running.
After exiting the export modal, you may either download the file from an admin message after the export is finished or go to WooCommerce > Exports > Export List, where the exports are held for 14 days.
Exporting Data from the Orders List
To begin, log into your WooCommerce account and then navigate to the Orders area of the admin panel. You must select one or more orders to export. The Exported filter may be used to display orders depending on whether or not they have been exported. You must select your preferred action from the three options provided in the Bulk Actions menu. All you have to do now is press the Apply button. You can obtain the file as stated above if you pick an instant download (for example, Download to CSV or Download to XML). If you select Export and Transmit, you’ll be asked to send one of your automated order exports over the same transfer method. Only automatic order exports by FTP, HTTP POST, or email transmission methods are possible for this export type.
Exporting Orders Automatically
If your site supports background processing, you may set up one or more automated exports to distribute customers or order export files regularly. Select whether your file should be exported in CSV or XML format as the output type. Choose if you want orders, customers, or coupons to be exported.
Filename, assign a name to the files produced for the export. Select from several predefined or custom forms. You must specify when the export will take place in this stage. To do so, adjust the Trigger automatic export option according to your requirements. By modifying the Method parameter, you may choose how the export will be transmitted or transferred.
WooCommerce Table Rate Shipping – PRO
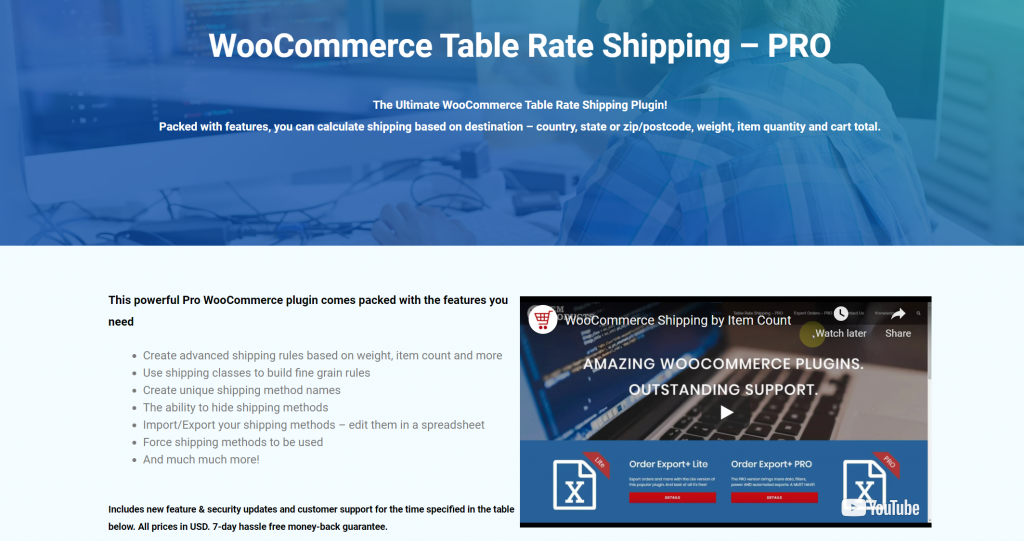
WooCommerce Table Rate Shipping PRO is a vital plugin that works extremely well with WooCommerce Order Export PRO. This plugin allows you to create different shipping rules according to weight, item count, and more. You can also create your own custom shipping rules and edit shipping methods in a spreadsheet.
Conclusion
WooCommerce includes an order management screen built-in. Depending on the things you sell, you might be able to keep track of all of your customers’ purchases with just this feature. It will be as easy as managing your supply orders with monday.com.
As you may be aware, having a backup of your client orders is typically a smart idea. Orders contain customers’ names, email addresses, order IDs, billing and delivery addresses, etc. So, you should store a copy of this data on your computer rather than depending on your web server.